Add Row
Add Element
cropper
update
Cape Coral Home Improvement
update
Add Element
  • Home
  • Categories
    • Home
    • Improvement
    • Style
    • Upgrades
    • Design
    • Renovation
    • Creativity
    • RealEstate
    • SmartTech
    • CapeCoral
  • Landscaping
  • Roofing
  • All Posts
  • Home
  • Improvement
  • Style
  • Upgrades
  • Design
  • Renovation
  • Creativity
  • RealEstate
  • SmartTech
  • CapeCoral
  • Landscaping
  • Roofing
July 28.2025
2 Minutes Read

Your Complete Guide on How to Remove a Garbage Disposal Safely

Close-up of removing a garbage disposal under a kitchen sink.

Your Step-by-Step Guide to Removing a Garbage Disposal

If you're a homeowner looking to upgrade your kitchen or resolve garbage disposal issues, knowing how to remove a garbage disposal safely is essential. Whether you're planning a kitchen remodel in Cape Coral or just fixing an old unit, this straightforward guide will walk you through the necessary steps.

Gather Your Tools for Success

Before diving into the removal process, ensure you have the right tools at hand:

  • Adjustable Pliers or Wrench: For loosening connections.
  • Screwdriver: To remove screws safely.
  • Bucket or Towels: To catch spills.
  • Non-Contact Voltage Tester: To for safety in handling electricity.
  • Putty Knife: To scrape off old sealants.
  • Mild Cleaning Agent: For cleaning the sink afterward.

Prioritize Safety Before You Start

Before beginning the removal, it's crucial to prioritize safety. Here’s how:

  1. Power Safety: Turn off the power at the circuit breaker or unplug the unit.
  2. Water Control: Shut off the sink's water supply.
  3. Protective Gear: Wear gloves and goggles for added protection.

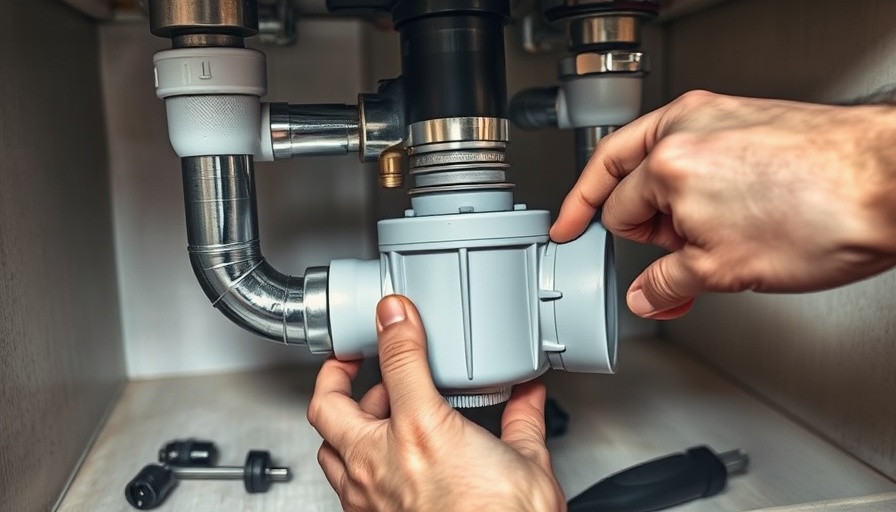
Step-by-Step Instructions to Remove Your Garbage Disposal

Follow these steps to successfully detach your garbage disposal from the sink:

  1. Disconnect the Power Supply: Ensure the power is turned off either by switching the circuit breaker or unplugging the unit. Use a non-contact tester to verify.
  2. Remove the Drain Lines: Place a bucket beneath the sink to catch any water. Loosen the screws on the dishwasher drain hose and detach the pipes gently.
  3. Detach the Disposal: Once the drain lines are loose, turn the mounting ring counterclockwise and remove the garbage disposal from the sink.

Once you’ve successfully removed your garbage disposal, consider the next steps in your kitchen remodeling project in Cape Coral, or find inspiring landscaping services to beautify your outdoor spaces.

As you navigate your kitchen renovations or address plumbing issues, remember that tackling small projects can significantly enhance your home’s value and functionality. Keep your environment safe and efficient by handling tasks like these yourself whenever possible!

Home

3 Views

0 Comments

Write A Comment

*
*
Related Posts All Posts
08.11.2025

Elevate Your Home: How to Clean a Braided Rug for Longevity and Style

Update Revitalize Your Space with a Pristine Braided RugBraided rugs stand the test of time, not just in style but also in the comfort and warmth they bring to any room. Yet, maintaining their charm might seem daunting for those unfamiliar with their upkeep. As we dive into how to clean a braided rug effectively, let’s shed light on the tools, techniques, and tips that ensure your rug continues to enhance the value and aesthetics of your space.Understanding the Essentials: Materials You NeedBefore embarking on your cleaning journey, ensure you gather the right tools. Essential items for cleaning a braided rug include:White vinegarWarm waterToothbrushVacuum cleaner with a gentle, non-rotating brushSpecialized rug cleaning productsMany of these items are common household materials, but the key is to select a rug cleaner that’s safe for your specific rug fibers. This prevents any potential damage while ensuring your rug looks vibrant and clean.Mastering the Cleaning Process: Step-by-Step GuideCleaning your braided rug involves a few essential practices:1. Routine Vacuuming: A Must-DoRoutine maintenance is crucial for keeping your rug in top shape. For high-traffic areas, a weekly vacuum is essential to keep away dirt and dust that can dull the rug’s beauty. Opt for a vacuum with a gentle brush – rotating bristles can fray or damage the fibers.2. Eliminate Stains PromptlyAccidents happen, and when they do, addressing stains immediately is paramount. Prepare a quick solution using equal parts white vinegar and warm water. Dab the affected area gently using a toothbrush; the acid in vinegar works wonders on stubborn stains. The quicker you act, the easier it will be to restore your rug.3. Deep Cleaning for LongevityWhile regular upkeep is vital, a deeper clean is recommended at least once or twice a year. For this, take your rug outside and shake it vigorously to dislodge dirt particles. Consider spot cleaning with your vinegar solution for noticeable stains, and let the rug air dry completely.Adding Value: Why Knowing This Information MattersUnderstanding how to clean and maintain a braided rug is beneficial not only for aesthetics but also for prolonging its life. A well-maintained rug can significantly boost the overall ambiance of a room. It is a wise investment, particularly in homes where style and comfort matter.Frequently Asked Questions about Braided RugsWhen it comes to cleaning braided rugs, many questions arise. Here are some common concerns:Can a braided rug be machine washed?Typically, many braided rugs can withstand machine washing on a gentle cycle. Always check the care label before proceeding.What should I do if my rug gets moldy?For mold issues, it’s best to take the rug outside and shake it out. Use a mixture of water and vinegar to clean the affected areas and allow it to dry completely.Practical Tips to Enhance Your Rug ExperienceTo keep your braided rug looking its best, avoid placing it in excessively damp areas, and rotate it occasionally to avoid uneven wear. Keeping a mat beneath can also add a layer of protection.Conclusion: Take Charge of Your SpaceCleaning and maintaining your braided rug not only rejuvenates its appearance but also maximizes its lifespan. It’s not just a cleaning task; it’s a commitment to preserving the beauty of your living space.

08.09.2025

Essential Techniques for Repairing Laminate Flooring: A Homeowner's Guide

Update Understanding the Importance of Timely Repairs Laminated flooring is prized for its durability and aesthetic appeal, making it a popular choice in both residential and commercial spaces. However, neglecting minor damages can lead to more significant problems if not addressed promptly. This guide is designed to help homeowners, especially those in regions like Cape Coral, understand the importance of timely repairs and the best strategies to take care of their laminate flooring. Tools for a Successful Repair Before diving into repairs, it's essential to gather the right tools. A laminate floor repair kit can be invaluable, and it's crucial to select one that matches the finish of your flooring. These kits typically contain repair markers, putty, and even cleaning cloths — all necessary for restoring the floor's appearance. Keeping your repair kit handy not only prepares you for unexpected scratches but also saves time when dealing with wear and tear. DIY Methods: Quick Fixes for Minor Scratches 1. **Clean the Area:** Start by removing dirt and dust from the damaged area. A damp cloth works wonders to prepare the surface for repairs. This step is critical since dirt can interfere with adhesive applications, causing longer-term issues. 2. **Employing a Repair Marker:** For light scratches, a flooring repair marker is an easy fix. After applying the marker, allow it to set for about thirty minutes. While this solution may be temporary, it effectively disguises small blemishes. 3. **Applying Putty for Larger Scratches:** For more severe damage, applying putty with a putty knife can create a smooth surface. Allow it to dry for an hour, then gently sand and clean the area to ensure a seamless finish. Addressing Water Damage Promptly While laminate floors are water-resistant, they are not waterproof. If your flooring has sustained water damage, acting fast is crucial. Begin by removing any visible mold; it's not just about aesthetics but also about health and safety. Eliminate the dampness as quickly as possible to prevent further damage. If the water has penetrated deeply, sometimes replacing the affected planks is necessary. Always consult with experts in flooring if you're uncertain about the extent of damage and repairs. Long-Term Maintenance Tips The longevity of your laminate flooring greatly depends on regular maintenance. Here are a few tips to extend its life: **Regular Cleaning:** Routine cleaning is essential. Use a soft broom or vacuum designed for hard flooring. **Avoid Excess Moisture:** Dry spills promptly to prevent water damage, and consider placing mats or rugs in high-traffic areas that can accumulate moisture. **Reinforce with Underlayment:** For new installations, using quality underlayment can significantly reduce the risk of damage from moisture and provide better sound insulation. Professional Help Vs. DIY While many repairs can be effectively handled at home, there may be times when a problem is beyond simple fixes. Hiring a professional can save both time and money in the long run, especially for extensive water damage or complex installations. For residents in Cape Coral, connecting with local experts in flooring repair and home inspection can ensure your laminate floors are maintained well. Conclusion: Preserve Your Investment Laminate flooring can last for many years if cared for properly. Understanding how to tackle minor damages and knowing when to call in professional assistance is key to preserving your investment. As you explore options like landscaping services Cape Coral, or consider kitchen remodeling Cape Coral, remember that maintaining a harmonious aesthetic in your home includes well-designed, well-maintained flooring.

08.07.2025

How Much Does a Home Sauna Cost in 2025? Discover Your Options!

Update Unlocking the Cost of Home Saunas in 2025If you’re dreaming of a personal retreat that soothes both body and mind right in your home, a sauna might be at the top of your list. As of 2025, the cost of adding this luxury to your living space ranges from about $3,000 to $10,000, with various factors influencing this price. Let’s dive into the various types of home saunas and understand what makes them tick!Diverse Sauna Types: What's Your Pick?Choosing a sauna is more than just a financial decision; it's about selecting the right vibe for your wellness journey. Here’s a rundown of several popular types:1. Wood-Burning SaunaFor those who revel in the traditional, wood-burning saunas create a nostalgic atmosphere. They require extra maintenance, such as purchasing wood regularly, which can escalate costs. These saunas provide a unique, customizable experience—but at a price. You'll need to balance the allure of crackling wood with the practicality of your budget.2. Electric SaunaModern comforts come with electric saunas, allowing for precise temperature control with a flick of a switch. While the convenience comes at a higher price—electric units can be costlier and can contribute to increased electricity bills—the ease of installation for both indoor and outdoor settings is unmatched. For Cape Coral homeowners, this option can blend seamlessly with energy-efficient landscaping efforts.3. Infrared SaunaInfrared saunas are the latest trend, boasting effective thermal therapy without high humidity. They provide a rejuvenating sweat while being more energy-efficient. Being versatile in location, these saunas can fit in homes with varying sizes and layouts, making them a viable option for many Cape Coral residents looking to enhance their personal space.4. Steam SaunaSteam saunas bring the luxury of a spa right into your home. They offer therapeutic benefits and are often found in high-end hotels. The installation can be a DIY project, potentially reducing costs, but depending on your preferences and desired features, prices can skyrocket to $10,000.5. Shower-Sauna CombinationFor those looking to maximize utility without excessive expense, a shower-sauna combination might be an ideal choice. The flexibility in design allows homeowners to create a dual-purpose space that’s practical on multiple fronts. This option expands the value of your property while serving as an aesthetic upgrade to your bathroom.The Real Investment: Why Choose a Home Sauna?Beyond the initial costs, consider the long-term benefits of installing a sauna: improved health through regular use, potential increases in home value, and the personal sanctuary it provides. Especially in Cape Coral, where outdoor temperatures can be high, an indoor sauna can enhance your lifestyle, making the investment feel worthwhile.Decision-Making Insights for HomeownersBefore leaping into construction, think about your personal wellness goals. Do you prefer the ambiance of a wood-burning sauna, or does the quick convenience of an electric sauna better fit your life? Each type has unique benefits, and understanding these can help inform your decision and budget.Bringing It Home: How This Affects Cape Coral ResidentsIn a vibrant real estate market like Cape Coral, incorporating a sauna can significantly increase your property’s appeal. Enhanced with professionally landscaped outdoor areas, a sauna not only serves as a wellness retreat but could also attract future buyers.Take ActionIf you’re intrigued by the possibilities of installing a sauna, don’t hesitate to explore your options. Reach out to local contractors, think about your ideal sauna type, and consider how it aligns with your living space. Your retreat awaits!

Terms of Service

Privacy Policy

Core Modal Title

Sorry, no results found

You Might Find These Articles Interesting

T
Please Check Your Email
We Will Be Following Up Shortly
*
*
*